Smart Home
How to Install a Smart Doorbell Yourself — 2026 Step-by-Step Guide
Installing a smart video doorbell yourself is one of the cleanest DIY wins in 2026 — most homeowners complete the install in 30-60 minutes with sub-$30 in tools, saving $80-$180 in electrician labor. This guide walks the full process for hardwired installs (Ring Pro 2, Nest Doorbell wired, Eufy E340) AND the battery-only path for renters or homes without existing doorbell wiring.
Before you start — the 3-minute compatibility check
Five things to verify BEFORE you buy a doorbell. These three minutes save the most common return:
- Existing wiring? Pop off your current doorbell. Two wires = hardwired install possible. No wires = battery-only model only.
- Transformer voltage? Most smart doorbells need 16-24 VAC. Older homes sometimes have 8-10V transformers (won't power the camera). Test with a multimeter — see the voltage section below.
- Existing chime type? Mechanical "ding-dong" chimes work with included diodes. Digital electronic chimes need a chime-kit power module (included with Ring Pro, sold separately for others — $25).
- Wi-Fi signal at the door? Stand at your front door with your phone. If you see less than 2 bars of Wi-Fi, the doorbell will be unreliable. Add a mesh node before installing.
- Door material? Wood frame = drill holes anywhere. Brick or stucco = you need a masonry bit + wall anchors (add 30 minutes and a $4 hardware run).
Tools you'll need ($28 total if buying everything new)
- Phillips #2 screwdriver ($4) — or the screwdriver bit that ships with most doorbells
- Drill with 1/4" bit for wood, 5/16" masonry bit for brick ($35 drill if you don't have one)
- Wire stripper / cutter ($8) — Klein 11055 or any basic stripper
- Voltage tester or multimeter ($15) — Klein NCVT-1 or any cheap multimeter
- Painter's tape ($3) — for marking screw locations cleanly
- Small level OR a level app on your phone
- Optional: USB drill driver for tight install zones ($35) — saves wrist pain
Step 1: Kill the doorbell circuit power
Find your breaker panel and trip the breaker labeled "Doorbell," "Bell," or sometimes "General Outlets" (in older panels). If nothing is labeled clearly, the doorbell transformer is usually wired into a hallway, garage, or basement junction box. Test by pressing the existing doorbell — no sound = power is off.
Important: Doorbell wiring is low voltage (16-24V), so the shock risk is low. But the TRANSFORMER's primary side is 120V mains. If you're working at the transformer (most homeowners aren't — you'll work at the doorbell), confirm the breaker is off before opening it.
Step 2: Remove the existing doorbell
- Loosen the screws on the existing doorbell faceplate (usually 2-3 screws).
- Pull the unit straight off the wall — the two doorbell wires are still attached behind it.
- Loosen the two terminal screws on the back of the unit and disconnect the wires.
- Use painter's tape to secure the bare wires to the wall so they don't fall back into the wall cavity. Photograph the original wire positions in case you need to revert.
Step 3: Test your transformer voltage
With your multimeter set to 24V AC (or auto-ranging), touch one probe to each wire. You're looking for 16-24 VAC. Common results:
- 16-24V AC ✓: Perfect. Continue to Step 4.
- 10-15V AC: Marginal. Will likely power the camera but may cause Wi-Fi drops on Ring Pro. Consider upgrading the transformer ($25 part + 30-minute install in the junction box, or $80-$150 if you hire an electrician).
- <10V AC: Won't power the camera. You'll need a 16V transformer upgrade.
- 0V: Either the breaker is still off (re-test) or your existing doorbell wiring is broken. Diagnose before continuing.
Step 4: Install the chime kit (digital chimes only)
If your existing chime is a digital chime (sounds custom tones, has a wall-mount speaker box), you need a "chime kit" or "power module" wired in parallel with the chime. The kit is typically included with Ring Pro 2 — it's a small adapter board with wire terminals.
- Locate the chime box (usually in a hallway or kitchen). Remove its cover.
- Inside, you'll see two terminals labeled FRONT and TRANSFORMER (sometimes "REAR" if you have a back-door bell too).
- Connect the chime kit per the included diagram — usually one wire to FRONT and one to TRANSFORMER, with the chime wires routed through it.
- Verify the chime still rings when the original doorbell is wired in temporarily.
Skip this step if: you have a mechanical "ding-dong" chime (no power module needed — the included diode handles it) or you don't have an existing chime at all (the doorbell will only ring on your phone).
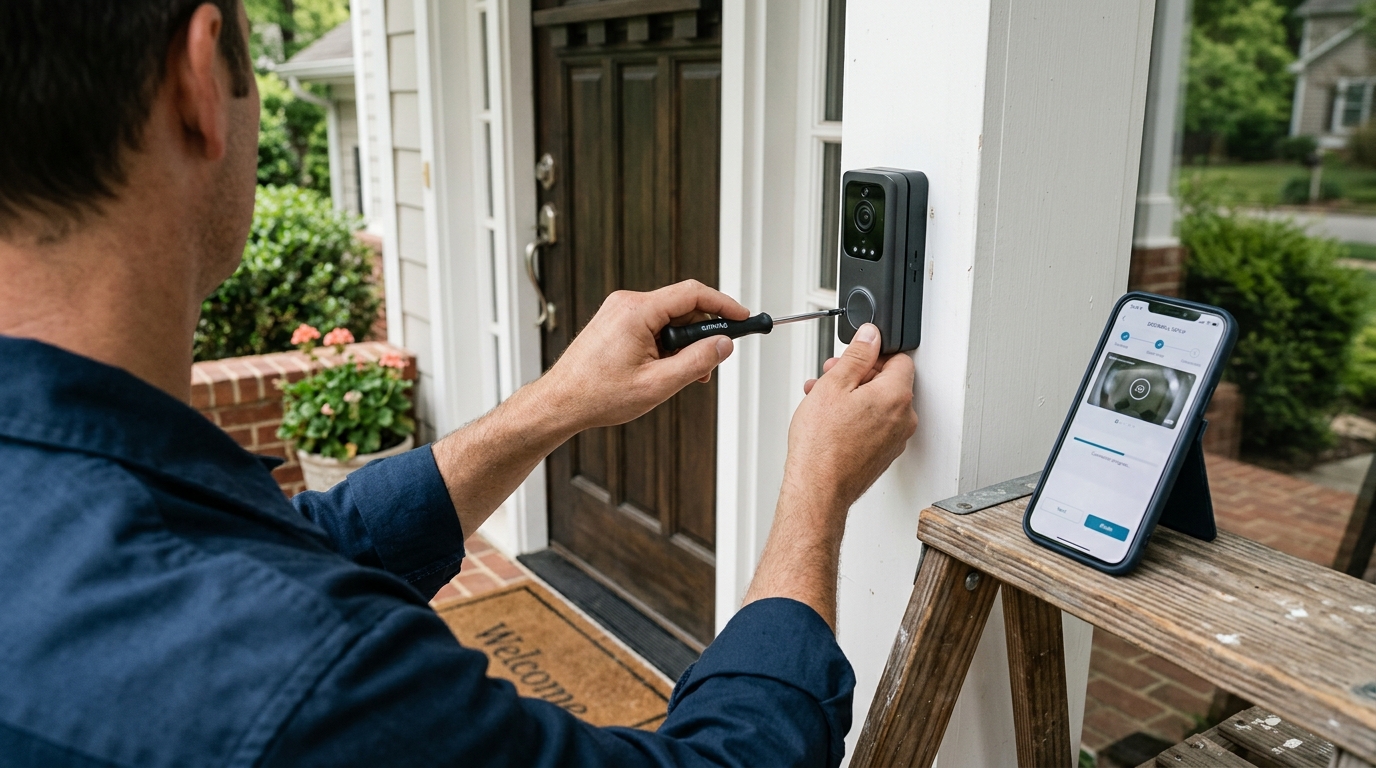
Step 5: Mount the doorbell base plate
- Hold the new doorbell mount against the door frame in your desired position (typically 48" from the ground for ADA-friendly height, 50-55" for tall homeowners).
- Use painter's tape to temporarily hold it, then mark the screw holes with a pencil.
- Check with a level — even a 5° tilt will look obviously wrong on a final install.
- Drill pilot holes (1/4" for wood, 5/16" for brick). Insert wall anchors for masonry installs.
- Pull the existing doorbell wires through the mount's wire-pass-through hole.
- Screw the mount to the wall.
Step 6: Wire the doorbell
- Strip 1/4" of insulation from each doorbell wire if not already stripped.
- Loop each bare wire under one terminal screw on the back of the doorbell unit. Polarity doesn't matter on most brands (it's AC).
- Tighten the terminal screws firmly — loose connections cause intermittent Wi-Fi drops.
- Tuck the wires into the back cavity so they don't get pinched against the wall.
- Click or screw the doorbell unit onto its mount.
Step 7: Restore power + pair with the app
- Flip the doorbell breaker back ON.
- The doorbell LED should illuminate within 10-30 seconds (some take up to 60s for first boot).
- Open the manufacturer's app (Ring, Google Home, Eufy Security, etc.) and start "Add Device."
- Press the setup button on the doorbell (location varies by brand — usually a small recessed button on the side or back). Scan the QR code if prompted.
- Connect the doorbell to your 2.4GHz Wi-Fi network. Most smart doorbells DON'T work on 5GHz.
- Update firmware if prompted (usually 5-10 minutes the first time).
- Test by pressing the doorbell — your phone should show a live video call within 3-6 seconds.
Common gotchas (and how to fix them)
"My doorbell installs but the chime doesn't ring"
99% of the time, this is a missing chime kit on a digital chime. Go back to Step 4. If you have a mechanical chime that's not ringing, check that the included diode is installed and the polarity is correct (most diodes are unidirectional — flip it if your chime stays silent).
"Wi-Fi keeps dropping out"
Usually one of three causes: (1) Wi-Fi signal at the door is weak — add a mesh node within 25 feet of the door, (2) transformer voltage is borderline — upgrade to 16V or 24V, (3) you're on a Wi-Fi 6E mesh that's forcing 5GHz — manually pair the doorbell to your 2.4GHz SSID.
"My doorbell is offset / not flush against the door frame"
Use a doorbell wedge mount ($8 on Amazon). These ship in 5-25° angles to compensate for door frames that aren't flush to the wall. Most homes need a 15° wedge for the angled-trim molding next to the front door.
"The doorbell trips my GFCI / breaker"
Almost always a shorted wire or pinched insulation. Remove the doorbell, inspect each wire for damage, and re-attach. If the issue persists, your doorbell transformer may be failing — swap it out for $25.
When to call an electrician anyway
- You don't have ANY existing doorbell wiring AND want a hardwired install — running new low-voltage wire through a finished wall is a 2-4 hour job.
- Your transformer voltage tested under 10V AC — replacing the transformer is touching 120V mains, which has a real shock risk for first-time DIYers.
- Your home was built before 1970 and the doorbell wiring is cloth-insulated or fabric-braided. These old wires are brittle, asbestos-adjacent, and best handled by a pro.
- Brick or stucco facade where you're uncertain about anchoring — the wrong anchor will pull the doorbell off the wall on first ring.
Pro-install cost in 2026: $80-$180 for a standard hardwired smart doorbell, including chime-kit install. Add $25-$80 for a transformer swap if needed.
Sources & methodology
Install procedures verified against the 2026 manufacturer documentation for Ring Pro 2, Google Nest Doorbell (wired, 2nd gen), Eufy E340, and Aqara G4. Voltage and chime-compatibility guidance pulled from manufacturer support docs plus practitioner notes from licensed low-voltage installers.
Bottom line
For 80% of homeowners with existing doorbell wiring, a 30-60 minute DIY install saves $80-$180 in electrician labor with zero compromise on the final result. The three biggest gotchas — transformer voltage, chime kit on digital chimes, and Wi-Fi signal at the door — are all solvable in advance with the 3-minute compatibility check at the top of this guide.
For broader smart-home context, see the Smart Home Upgrade Cost Guide 2026. To understand whether the upgrade pays back at sale, does smart home tech increase home value?